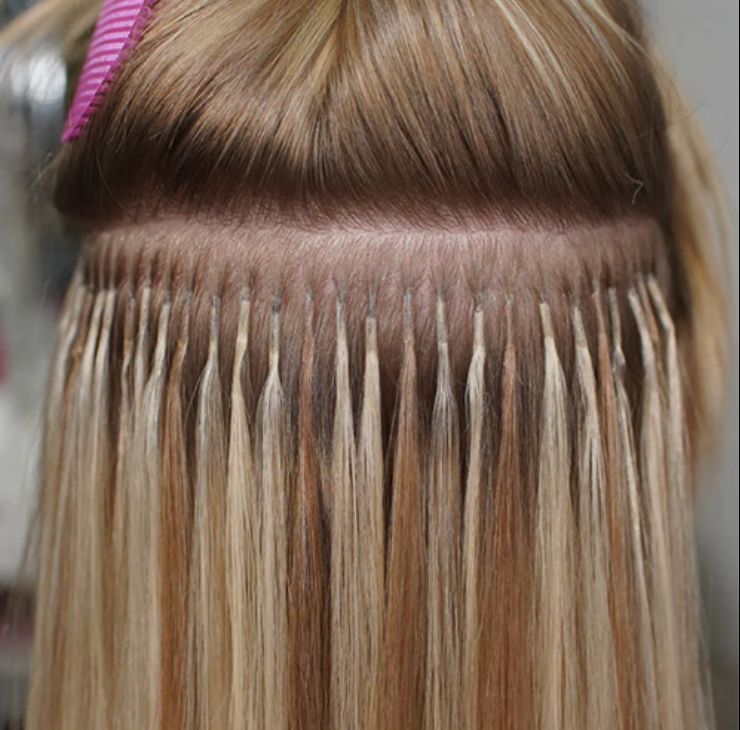
Tape-in extensions are thin, flat wefts of hair with a strip of adhesive along the top. A slim section of your own hair is sandwiched between two wefts, which lets them lie flat and move with you. They are the quickest extension install to sit through, they feel light on fine to medium hair, and they work in a repeating cycle of wear, move-up and reapply. Here is what to expect from your first appointment through removal.
What tape-in extensions are
Each tape-in is a narrow panel of hair with a thin adhesive strip across the top edge. Your stylist takes a thin, even slice of your natural hair, places one weft underneath and one on top, and presses them together. The result is a flat "sandwich" that sits close to your scalp.
Because each piece covers more hair than a single strand-by-strand bond, it takes fewer attachments to add noticeable volume. That is why the install is shorter than methods like K-tips.
If you are still deciding between methods, read the full K-tip vs. tape-in vs. sew-in comparison first. This guide goes deep on tape-ins only.
Who tape-ins suit
Tape-ins tend to be a good match if you:
- Have fine to medium hair. The flat wefts spread weight across a wider area, so they don't pull on one tiny spot.
- Want volume more than dramatic length. They are great for filling out thin ends or adding thickness around the face and crown.
- Are new to extensions. A shorter first appointment makes it an easy way to see how you like wearing extra hair.
- Can return for regular move-ups. Tape-ins need maintenance on a steady schedule as your hair grows.
They may not be your best pick if:
- You wear high ponytails or tight updos most days. The tapes can show when hair is pulled straight up.
- You love oil-heavy hair products. Oils near the root loosen adhesive.
- Your scalp gets very oily. Natural oil can break down tape faster, which shortens wear.
- Your hair is very short. There needs to be enough length above and around the tape to cover it.
What happens at the install
The Tape-In service starts at $125 on the current menu, plus the cost of the hair, and is listed at about 2 hours. All extension services are request-to-book, and the hair is purchased separately and color-matched to you at your consultation. You can see the details on the Tape-In service page.
A typical install looks like this:
- Clean, dry hair. Your hair needs to be free of oil, silicone and leave-in products so the tape grips. Your stylist may give it a clarifying wash first.
- Sectioning. Rows are mapped out so the wefts sit below your part line and any areas where you like to tuck your hair.
- Placing the wefts. Each thin slice of natural hair is sandwiched between two wefts and pressed firmly so the adhesive bonds.
- Checking spacing. Wefts are spaced so you can still part and brush without seeing them, and so no section carries too much weight.
- Cut and blend. The extension hair is cut into your natural hair so the ends blend instead of looking like a shelf.
- Style and walk-through. You'll leave with it styled and a quick lesson on brushing and washing.
For a checklist of what to bring and how to prep the week before, see how to prepare for an extensions appointment.
The first week of wear
Your hair may feel a little fuller and tighter at the root for the first few days. That's normal and usually fades as you get used to it.
A few first-week rules make a real difference:
- Wait before the first wash. Adhesive needs time to fully set. Your stylist will tell you how long to wait.
- Keep products off the tapes. No oils, serums or heavy conditioner near the root.
- Brush from the ends up. Hold the hair just below the tapes with one hand while you brush with the other.
- Sleep with dry hair in a loose braid. Wet tape-ins tangle and can slip.
Daily life with tape-ins
Once they settle, tape-ins are low fuss. The main habits are about protecting the adhesive and keeping your natural hair and the extension hair moving together.
| Habit | Why it matters |
|---|---|
| Brush two or three times a day with a soft or loop brush | Prevents small knots from forming at the tape line |
| Wash with sulfate-free, oil-free products at the root | Oils and some cleansers loosen adhesive |
| Dry the root area fully after every wash | Damp tapes are more likely to slip and tangle |
| Use heat protectant and keep tools off the tapes | Direct heat softens adhesive |
| Wear a loose braid or low pony to the gym and to bed | Cuts down on friction and matting |
For step-by-step routines, see how to wash hair with extensions. Kansas City summers add humidity and sweat, so plan on drying your roots carefully and keeping workouts to a loose braid.
Move-ups: the tape-in cycle
As your natural hair grows, the tapes move down and away from your scalp. Once they sit too far down, the weight hangs from a longer piece of your own hair. That can cause tangling at the root and extra stress on those strands.
A move-up resets everything:
- The current wefts are released with adhesive remover.
- Your hair is cleaned and any leftover residue is removed.
- The extension hair is cleaned and re-taped if it is still in good shape.
- The wefts are reapplied back up near the root.
The Move Up service starts at $100 and is listed at about 4 hours on the current menu, with the final price varying by method. See the Move Up service page. Your stylist will set a schedule based on how fast your hair grows and how the tapes are wearing. For signs you're due, read extension move-ups and removal.
Removal
When you're ready for a break or done with extensions, removal should always happen in the salon. A remover is applied to dissolve the adhesive, the wefts slide apart gently, and any residue is cleaned out of your hair. Pulling tapes off at home can rip out your own hair along with the adhesive.
Removal starts at $100 on the current menu and is listed at about 2 hours. See the Removal service page.
Tape-in costs at a glance
| Item | Current menu |
|---|---|
| Tape-In install | Starts at $125, plus hair |
| Hair | Purchased separately; depends on length, amount and quality |
| Move Up | Starts at $100 |
| Removal | Starts at $100 |
| Client Consultation | Free, 15 minutes |
The hair is the piece that varies most, so it's picked and priced at your consultation. For a fuller look at budgeting a year of wear, see what hair extensions cost in Kansas City.
Start with a consult with Hoshika
I do tape-in installs one-on-one in my private studio inside Willow Salon & Suites on 135th Street in Overland Park. At your consultation I'll look at your density, how you wear your hair and how often you can come back, then color-match your hair so the wefts disappear into your own. If tape-ins aren't the right fit, I'll tell you and we'll look at another method. Book a free consultation to get started.
Frequently asked questions
Do tape-in extensions damage your hair?
Placed on the right size section, cared for gently and moved up on time, tape-ins are one of the lighter extension methods. Most problems come from skipped move-ups, oil on the tape or pulling them out at home.
Can I wear a ponytail with tape-ins?
A low or mid ponytail usually works well. High ponytails take planning, so tell your stylist at the consultation if you wear your hair up a lot and the wefts can be placed to stay hidden.
Can tape-in hair be reused?
Often, yes. Good-quality hair that has been cared for can usually be cleaned and re-taped at a move-up, which is one reason tape-ins are popular for ongoing wear.
How long is a tape-in appointment?
The install is listed at about 2 hours on the current menu. Move-ups take longer because the old tape is removed, the hair is cleaned and re-taped, and then everything is reapplied.
Book with Hoshika
Want this done for you?
Private one-on-one studio in Overland Park. Free consultations for big changes.